An Amazing Beef Liver Recipe (That Doesn’t Taste Like Beef Liver)

Beef liver fries

Beef liver fries

Beef liver is known for two things: its all-star nutrient profile and its pungent, unmistakable taste.

My family has tried 4 beef liver recipes in the last year, and this one is excellent because...well, it doesn’t taste like liver! 

The key is to slice and soak the liver; the soaking removes the pungent taste. 

After soaking, the liver is battered, fried, and dipped in garlic aioli --  it’s a crowd-pleasing, crunchy preparation. Enjoy!

Beef liver fry dipped in garlic aioli.

Beef liver fry dipped in garlic aioli.

If you’re an instagramming kind of person, please tag us at @stjohnsorganicfarm when you post a photo of the final result! We would love to see how it went in your kitchen!
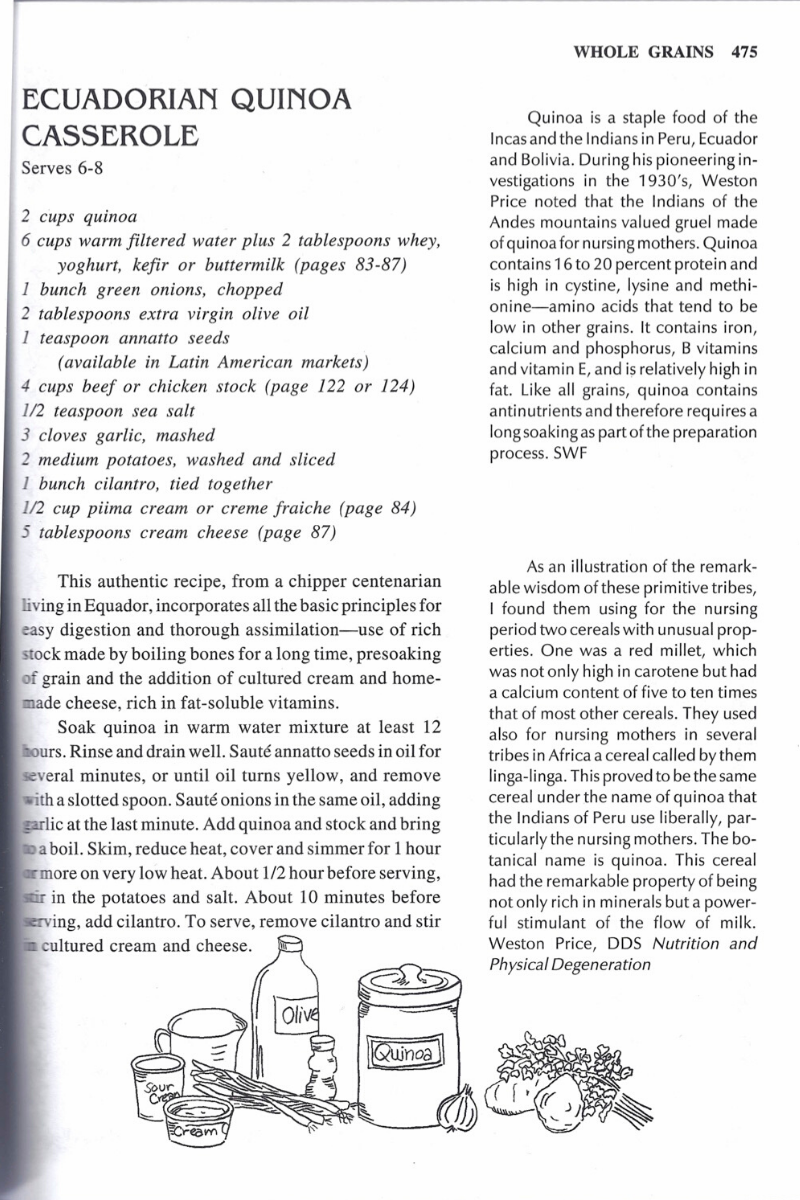

Beef Liver “Fries”


INGREDIENTS

  • 1 lb St. John’s organic, grass-fed beef liver

  • 2 - 2 1/2 c flour

  • 1 teaspoon paprika

  • 1/4 tsp salt

  • 1/4 tsp black pepper

  • roughly 2  c buttermilk, milk, or whey

  • roughly 1 c beef tallow, enough to be at least 1/2 inch deep in frying dish

EQUIPMENT

  • cutting board

  • knife

  • food storage container with lid

  • heavy-bottomed dutch oven or deep skillet

  • prep bowls

  • tongs

  • cooling rack (optional)

  • baking sheet (optional)

  • splatter guard (optional)

METHOD

1. Slice liver into 1/4 - 1/2 inch wide strips. Place into food storage container and cover with buttermilk, milk, or whey. I used about 1 cup. Place in refrigerator and allow to soak for at least 2 hours. I left it soak overnight and continued the preparation the following day.

Beef liver sliced into ½-inch wide strips.

Beef liver sliced into ½-inch wide strips.

2. Drain liver and pat dry.

3. Mix together flour, paprika, salt, and black pepper in a shallow bowl. Pour remaining 1 cup buttermilk, milk, or whey into another small bowl.

4. To batter the liver, roll one slice in seasoned flour, dip in milk, and roll in flour again. Place slice on cooling rack. Repeat until all liver slices are battered.

Battered liver slices placed on cooling rack, ready for frying.

Battered liver slices placed on cooling rack, ready for frying.

5. In a heavy-bottomed Dutch oven (I used cast iron), melt tallow on medium heat. When tallow is about 350 degrees, it’s ready to use. If you don’t have a thermometer, sprinkle a pinch of flour on the tallow. If it sizzles and swirls, it’s ready.

Tallow melting in Dutch oven.

Tallow melting in Dutch oven.

6. Place 2-3 paper towels on baking sheet with  unused cooling rack on top. This will be where the fried liver will rest after cooking. The paper towels will help absorb any extra fat.

7. Using tongs, slowly add 3-5 battered liver slices to the hot tallow. The tallow should sizzle and bubble around the liver. Be careful not to crowd the pan, as that will cause the tallow to cool and prevent it from cooking properly. 3-5 slices worked well for my pan.

Liver slices frying in tallow. The bubbling means the tallow is hot enough!

Liver slices frying in tallow. The bubbling means the tallow is hot enough!

8. The liver will cook quickly. Using tongs, slowly flip each liver slice after 1.5 - 2 minutes. Cook another 1-2 minutes and transfer to cooling rack. Repeat until all liver is fried.

NOTES

1. Kid-friendly modification: To make this recipe more kid-friendly, substitute ketchup, mustard, or sour cream for garlic aioli and omit or use less paprika and black pepper in the seasoned flour.

2. Easily reheat by baking at 200 degrees for 10 minutes.

Garlic Aioli

INGREDIENTS

  • 1 large egg

  • 1 - 1.5 c avocado oil, olive oil, or melted duck fat

  • 1 - 2 cloves garlic, minced

  • 1 tsp mustard

  • 1 Tbsp apple cider vinegar or distilled white vinegar

  • 1/4 tsp salt

EQUIPMENT

  • blender or immersion blender

  • rubber or silicone spatula

  • spoon

METHOD

1. Crack egg into blender.

2. Turn blender on medium speed and blend egg.

3. While blender is mixing, very slowly pour oil or fat into blender. Start with one cup and add more at the end to reach your desired consistency. 1 1/3 cup was ideal for me. The stream of oil should be thin. It’s essential to pour slowly for a proper emulsion to form. It should take 4-5 minutes to pour the oil. After 1 cup of oil has been blended in, turn off blender and gently shake and scoop aioli with spoon to determine if desired consistency has been reached. If you prefer your aioli to be thinner, add 1/4 cup of oil at a time in the same slow manner.

4. Turn off mixer. Add garlic, mustard, vinegar, salt. Blend. Taste for salt and desired tanginess. You may desire more mustard or vinegar.

5. Serve at room temperature or chilled. Store in an airtight container in the refrigerator.

I hope you enjoy this unique and crunchy preparation of beef liver. Tag us on Instagram to let us know what you think!

How to Render Beef Tallow

Tallow, golden in color and solid at room temperature.

Tallow, golden in color and solid at room temperature.

Tallow is rendered beef fat. Rendering means the fat has been melted on low heat for several hours and strained of impurities, leaving us a result that is mild in flavor and smell, chock full of fat-soluble vitamins A, D, E, and K and minerals, and long-lasting if well kept.

Equipment

  • St. John’s organic beef fat, chilled

  • Knife

  • Cutting board

  • Food processor or meat grinder (optional but very helpful)

  • stock pot

  • cheese cloth or flour sack towels

  • colander

  • storage vessel (mason jar, baking dish, food storage container, etc.)

Process

1. Trim off bits of muscle and tendon left on the fat. As you cut, you will notice a cellophane-like membrane all over the fat. Pull off what you can, but it’s impossible to get all of it off.

Fat after being trimmed of muscle bits.

Fat after being trimmed of muscle bits.

2. Cut the fat into 1 inch or smaller chunks. Cutting it into chunks will make grinding it in the food processor or meat grinder much easier.

Trimmed fat cut into chunks.

Trimmed fat cut into chunks.

3. Process the fat chunks in the food processor or meat grinder until it looks like ground meat. If you don’t have a meat grinder or food processor, mince the fat as small as you can with a sharp knife. By breaking the meat into small chunks, we create a lot of surface area for each piece of fat. The increased surface area allows for more opportunities for the impurities to render out of the fat. This will result in a tallow that is very mild in smell and taste.

Beef fat processed into small granules.

Beef fat processed into small granules.

4. Place ground fat into a large stock pot or crock pot and turn heat to the lowest setting possible. Stir every hour or so and check that the fat is not burning or smoking. The fat will melt and impurities (small solid bits) will come out of the fat and rise to the top. You will know the fat is done rendering when the impurities rise to the top and look crunchy. The total time will vary based on how much fat you use. Expect it to take 5-10 hours. When I rendered 7 lbs of fat, it finished in 8 hours.

Ground fat beginning to melt in stock pot.

Ground fat beginning to melt in stock pot.

Impurities are rendering out of the melted fat, about 2 hours in.

Impurities are rendering out of the melted fat, about 2 hours in.

5. Line a colander with two layers or cheese cloth or flour sack towels and drain over a large bowl. Gently squeeze the towel to get all of the liquid fat out. Careful, it may be hot!

6. Once it’s finished draining, pour fat into storage vessel of choice. I poured mine into a parchment paper-lined glass baking dish. I did this because I prefer to store my tallow in bars over mason jars. I find it difficult to scoop cold tallow out of a mason jar with a spoon, but slicing off of a cold tallow bar is easy and convenient. (I got this storage tip from Jill Winger at The Prairie Homestead, you’ll love her blog if you’ve gotten this far.)

7. Leave fat at room temperature to cool until solid. When solid, transfer to refrigerator or freezer. I cut mine into bars before refrigerating. Tallow will keep for several months in the fridge, and I’ve read accounts of tallow keeping in the freezer for years! Some people also store it at room temperature; expect it to last about a month on a cool, dark pantry shelf. I was surprised to see the end result be yellow since most commercial tallow renders white. There are a lot of variables that go into the end result color, such as the breed of cow, its diet, its age, and where the fat was on the animal. The rich golden color is an excellent indicator of the vitamin A preset in the fat. This nutrient comes from the grass that the cows ate, and would not be present in grain-fed beef.

Tallow solidifying into a beautiful golden yellow. I was surprised to see it turn yellow!

Tallow solidifying into a beautiful golden yellow. I was surprised to see it turn yellow!

8. Enjoy! Tallow is excellent for frying (McDonald’s used to use it for french fries before switching to harmful vegetable oils), sauteeing, searing meat, and for use in homemade skin-care. My cast iron skillet loves tallow; it adds a great seasoning to keep it naturally non-stick.

Toddler approved!

Toddler approved!

Bringing the Soil Back to Life with David Johnson

Johnson-Su+bioreacter+pic.jpg

The following is from the Regeneration International website.

Healthy soil is teaming with life in the form of billions of microscopic soil organisms. A teaspoon of healthy soil can contain more soil microorganisms than there are people on earth. The soil microorganisms found in healthy,  or “living soil,”  have important functions including converting nutrients for plants, building soil structure, improving how soil absorbs water, and allowing soil to draw down and sequester more carbon.

Unfortunately not all soil is alive and healthy. According to the United Nations (UN), a third of the earth’s soils are severely degraded. Soils that have been degraded by degenerative forms of agriculture may have lost the living organisms that allow soil to perform the functions necessary for the health of plants and the environment.  

Dr. David C. Johnson, molecular biologist and research scientist at the University of New Mexico, has developed a system that brings lifeless soils back to life by reintroducing beneficial microorganisms to the soil with biologically enhanced compost.

The Johnson-Su composting method creates compost teeming with microorganisms that improve soil health and plant growth and increase the soil's potential to sequester carbon. This simple composting method produces a biologically enhanced compost by creating an environment where beneficial soil microorganisms and thrive and multiply. When this biologically alive compost is applied to the soil the microorganisms inoculate the soil and work in harmony with growing plants to improve soil health and increase the amount of carbon drawn out of the atmosphere and into the soil.

Benefits of Johnson-Su Bioreactor Compost:

  • Increases soil carbon sequestration

  • Increases crop yield

  • Increases soil nutrient availability

  • Increases soil water-retention capacity

  • Produces biologically diverse compost

  • Produces nutrient–rich compost

  • Results in a low-salinity compost

  • Improves seed germination and growth rates

Benefits of Johnson-Su Bioreactor Composting System:

  • Reduces water usage up to six times

  • Reduces composting labor time by 66 percent

  • Requires no turning and little manpower

  • Is a low–tech process that can easily be replicated

  • Can be made using a diversity of compost materials

  • Produces no odors or associated insects

  • Materials generally cost less than $35 USD and can be used for up to 10 times

  • No leaching or groundwater contamination

Get the instructions here.

Is Grass-fed Beef the Most Vegan Food?

Recently a friend shared an article with us entitled “Grass-fed Beef -- the Most Vegan Item in the Supermarket” written by Andrew French and posted on medium.com. It is thoughtfully laid out, and makes a strong case that conventional row-cropping creates far more suffering than the raising and harvesting of cows for grass-finished beef.

A grain field is plowed and turned multiple times to prepare for planting, and then the crop is mechanically weeded and sprayed. Each time, small animals are disturbed, poisoned, or outright chopped up, and the larger denizens of the natural world, the foxes and deer, are pushed far away, until that field is a moonscape and a mass graveyard of animal and insect life.

Contrast this with perennial pasture. In our pastures we grow a widely diverse mix of grasses, legumes, and herbs that provide complementing nutritional strengths for our cows, and provide cover and habitat for field mice, voles and earthworms as well as pheasants and quail, which in turn provide sustenance for hawks and owls and foxes. We also include buffer zones and transition areas along the edges of our fields that are wildlife highways.

When plants are not tilled, their root structures can grow several feet deep, sometimes up to 12 feet below the surface, helping to break up compacted soils, building healthy topsoil, and sequestering a significant amount of carbon.

We have advocated for local food for a long time, thus the author’s note about the steep demand for avocados stood out to me. According to his sources, America’s demand for avocados has driven the price out of reach for the average Mexican, where avocados are grown. Beyond that, avocado farmers in Mexico are now chopping down the pine forest habitats of the Monarch Butterfly to make room for more avocado plantations. Think about it! How many Monarch Butterflies inadvertently gave their lives for our guacamole? Nothing is without consequence.

If you have chosen a vegan diet because it feels better for your body, more power to you. We need to be sensitive to what works for each of us. However, if you have jumped on the vegan program out of concern for animals, consider this author’s perspective that vegetable and grain production takes more life than grass-finished beef.

All life is fed by consuming other life. Please appreciate, acknowledge, and respect the gift you receive in every meal. The more locally you can eat, the better you are able to do that.

Aaron

PS - Whenever people tell me “Thanks, we’re vegan,” I smile and say, “So are my cows!” :)

Ecuadorian Quinoa Casserole (from Nourishing Traditions by Sally Fallon)

A photo from the Nourishing Traditions cookbook

A photo from the Nourishing Traditions cookbook

Serves 6-8

From the Sally Fallon Cookbook, Nourishing Traditions

INGREDIENTS

  • 2 cups quinoa

  • 6 cups warm filtered water plus 2 tablespoons whey, yoghurt, kefir or buttermilk

  • 1 bunch green onions, chopped

  • 2 tablespoons extra virgin olive oil

  • 1 teaspoon annatto seeds (available in Latin American markets)

  • 4 cups beef or chicken stock 

  • 1/2 teaspoon sea salt

  • 3 cloves garlic, mashed

  • 2 medium potatoes, washed and sliced

  • 1 bunch cilantro, tied together

  • 1/2 cup piima cream or creme fraiche 

  • 5 tablespoons cream cheese

DIRECTIONS

This authentic recipe, from a chipper centenarian living in Equador, incorporates all the basic principles for easy digestion and thorough assimilation--use of rich stock made by boiling bones for a long time, presoaking of grain and the addition of cultured cream and homemade cheese, rich in fat-soluble vitamins. 

Soak quinoa in warm water mixture at least 12 hours. Rinse and drain well. Saute annatto seeds in oil for several minutes, or until oil turns yellow, and remove with a slotted spoon. Saute onions in the same oil, adding garlic at the last minute. Add quinoa and stock and bring a boil. Skim, reduce heat, cover and simmer for I hour more on very low heat. About 1/2 hour before serving, stir in the potatoes and salt. About 10 minutes before serving, add cilantro. To serve, remove cilantro and stir in cultured cream and cheese. 

NOTE FROM SALLY

Quinoa is a staple food of the Incas and the Indians in Peru, Ecuador and Bolivia. During his pioneering investigations in the 1930's, Weston Price noted that the Indians of the Andes mountains valued gruel made of quinoa for nursing mothers. Quinoa contains 16 to 20 percent protein and is high in cystine, lysine and methionine-amino acids that tend to be low in other grains. It contains iron, calcium and phosphorus, B vitamins and vitamin E,and is relatively high in fat. Like all grains, quinoa contains antin utrients and therefore requires a long soaking as part of the preparation process. SWF

Emmett Farm Memories

I asked my aunt if she would share some of her memories of moving to the Emmett farm and growing up here. We hope you enjoy these memories and photos as much as we did!


In 1934, jobs in South Gate, California were scarce. Frank Robinson was a skilled plasterer with a wife, Blanche, and two children, Frances and David, then aged 6 and 4. When they found themselves having to choose between gas for the Model T or milk for the children, they knew something had to change. A farm would mean a bit of security. At least they would eat! Frank had an acquaintance, Wes Awald, who had a dairy in Meridian, Idaho. He did Frank the favor of checking out the Larkin farm which was for sale in Emmett. It was 40 acres with a house and barn. His report was that the barn was good but the house was “not much.” Both were built with square nails. No plumbing in the house!

The decision was made. The Model T was traded for a larger Jewett for the trip. The kids’ cousin Don Malan was still in school, but old enough to drive the truck loaded with the family belongings. The trip took a week. It’s hard to imagine that trip without today’s highways, rest stops and drive through restaurants.

Blanche was beginning to have her doubts as they drove mile after mile through the desert. It was when they came to the top of Freezeout Hill and saw the beautiful valley below she began to feel confident about the move. In later years she would recall her relief, seeing “two shades of pink and white” stretching out below, in the valley that would be her home for the next 48 years.

They grew the grapes and bottled the juice themselves. Lots of the bottles were left behind as they drove. Less weight was better.

They grew the grapes and bottled the juice themselves. Lots of the bottles were left behind as they drove. Less weight was better.

TRAVELING

The trip from California to Idaho took a week, and the Robinsons had to picnic along the way. Frank fashioned a box to hold food, towels, and bottled grape juice. The photo shows one of the remaining juice bottles. The box would become a towel holder in the “wet room” of the home, a back room that Frank plumbed for a bathroom and laundry. Everything was used and reused, fixed or repurposed.

Frances with bee swarm

Frances with bee swarm

BEES

Frances was her Dad’s willing helper when the family kept bees. She turned the crank on the extractor and filled 5 pound tins so honey could be sold. The photo shows their bee keeping license issued by the Idaho Department of Agriculture. It came in the mail as a post card dated March 21, 1945 and had a 3 cent postage stamp.

IMG_20190720_144118775.jpg

A bulletin from the American Honey Institute dated May, 1945 suggested the following:

“Are you serving plenty of cottage cheese these days when meat is scarce? For dessert press cottage cheese through a sieve. Add 3 tablespoons of sour or sweet cream and 3 tablespoons of honey to each cup of cheese. Beat until fluffy. Add 1/8 teaspoon of salt. Note: This is also delicious when served as a topping on gingerbread, fruit gelatin, or cherry tarts.”

American Honey Institute Bulletin

American Honey Institute Bulletin

BALING HAY

During WWII farm laborers were hard to come by. To manage hay season, a loan from Blanche’s brother Will allowed them to purchase a Case wire baler. It took all four family members to complete the job. Frances drove the tractor; Blanche fed the wires into the slots of the wood block, wearing leather gloves; David tied the wires as the 100 pound bales worked their way to the end of the process; and Frank had the dusty job of placing the wooden block that marked the end of one bale and the start of a new one. It was the first baler of its kind in the Valley.

DAIRY COWS

Soon after arriving in Emmett, Frank arranged to pasture dairy cows in exchange for the milk, probably around 8 cows. Frances was the tail holder while her Dad sat on a T stool to milk. After some time, Frank fashioned tail holders from rubber hose and heavy wire. Milk went into 10 gallon cans to be cooled in the irrigation ditch until they were picked up. As time went on, they purchased a separator and sold cream to the creamery.


The NCAP Annual Report

NCAP helps protect our community through environmental health; they inspire the use of ecologically sound solutions to reduce the use of pesticides, and their work is helping so many farmers and communities in the Northwest.

NCAP assisted us in planting a native wildflower pollinator meadow, which is a mutually beneficial piece of land for both bees and farmers. To read their full report, go to http://www.pesticide.org/annual_reports.

AR2018Cover.jpg

Why We Chose Organic

By Emily Wahl

I didn’t grow up eating organic food. I’m sure many of you can relate to that. As a girl growing up in rural South Dakota in the nineties, the organic food movement had barely reached our radars. Frugality was the first priority, and my mom was an expert at getting meals on the table on a budget. Dinner was often a grilled meat paired with frozen vegetables or the ubiquitous Hamburger Helper. During the day I ate a fairly steady diet of junk food. A “caramel cappuccino” from a gas station on the way to school, or a box of Cheezits when I returned was common for me. The idea that this could be damaging to my health never occurred to me as I was skinny as a rail. But I was tired most of the time, and beginning to show signs of depression.

It wasn’t until I got to college and started developing more serious problems that I realized my diet had to change.

It has been a long and difficult process, but I have gone from being a person who was often stuck in bed to a person who is excited about what is in store for her life

Over the course of my time in college, my health began to rapidly get worse. I knew that there was something wrong, but I didn’t have the words back then. Today doctors have all sorts of words to define us. Words like autoimmune disease, adrenal fatigue, Hashimotos, and SIBO are all now at my fingertips, and I’m just a Google search away from discovering an overwhelming amount of information. But when I started to develop my problems I didn’t have these words; I didn’t have any understanding.

What I did know is that what we put in our body matters, and I had no hope of recovering my health without drastically changing my diet. It was around this time that I began to start researching what healthy eating really meant. With many competing health theories out there, this was quite the process. But all of the health experts seemed to agree on one thing; that we should be eating REAL food! Our food should be coming from farms or be as close to the source as possible. And it should be raised and grown according to time honored tradition, not sprayed with chemicals that are damaging to our health. I began to understand that it wasn’t just about organic, but about supporting a new, sustainable system of agriculture.

Eating organic and local food became about more than just healing my own body. It began to be about supporting the kind of community and culture that I want to live in. I want to know the people producing my food. I want access to the broad array of culinary delicacies that only come within a local food system. And I don’t want my children to be facing the environmental fall out from unsustainable ecological practices.

There is a lie we tell ourselves; that this will go on forever, and we will never get better.

As I have walked this health journey for over a decade now, there have been many elements that have been essential to healing. I have used supplementation, herbal medicine, therapy, exercise, and lifestyle changes. Organic food alone was definitely not enough to bring about lasting change. But without it, all of these other interventions would have had little effect. It is easy to slip up and eat poorly when we are inundated with the conventional system all around us. But for me, the ramifications of bad eating choices are felt immediately. I could lose all of my energy for days, or be in instant, severe pain. I am extremely grateful to get to live in a place where these conventional, processed foods are not my only option, and I have the ability to access a wide array of amazing local products. Now my diet is largely composed of seasonal produce from Idaho’s small farms, grass-fed beef, and our own backyard eggs.

For me, making a permanent shift to organic eating took a health-crash and the realization that the medical system did not have a pill that would ever substitute for taking ownership over my own health. I got sick and tired of looking at my dreams in the distance and knowing that my body wasn’t strong enough to pursue them. It has been a long and difficult process, but I have gone from being a person who was often stuck in bed to a person who is excited about what is in store for her life. I plan on making my thirties a time of new endeavors and vibrant health!

There is a lie we tell ourselves; that this will go on forever, and we will never get better. But often  that lie takes hold because we are stuck in a paradigm created by our dominate food culture. We live in a country that perpetuates illness by making unhealthy food seem normal, and training doctors to only help when the situation becomes dire. I thought I was alone with my problems, but I am beginning to see that I am just one of thousands battling for her health at far too young of an age. We have an opportunity to change the direction of our fast food culture and return to a way of living and eating that will make health the norm and not the exception.


Herb Rubbed Top Round Roast Beef

image0.jpeg

INGREDIENTS:

  • 1/3 cup fresh parsley chopped fine

  • 2 Tbsp minced fresh thyme

  • 1 shallot minced

  • 1 Tbsp Dijon mustard

  • 2 Tbsp olive oil

  • 4 Tbsp unsalted butter room temperature

  • (1) 4-5 lbs top round roast fat trimmed if needed

  • 1 Tbsp salt

  • 1 Tbsp pepper


DIRECTIONS:

  1. Mix the parsley, thyme, and shallot in a small bowl.

  2. Remove 2 Tbsp of the herb mix to another bowl and set aside.

  3. Add the mustard, and add 1 Tbsp of the oil to the remaining herb mix and stir to combine.

  4. With the previously reserved herbs, mash in the butter with a fork to mix everything well.

  5. Butterfly the roast by carefully cutting down the center of the roast, folding the cut end of the beef back, flattening, until you have cut almost entirely through. This allows for a better seasoning application throughout the beef.

  6. While spread flat, season liberally with salt and pepper on all sides.

  7. Using your fingers, spread the mustard mixture evenly over the interior of the meat.

  8. Fold the meat back up and tie with kitchen twine.

  9. Cover and allow the beef to rest in the fridge at least 4 hours.

  10. When ready to cook, preheat the oven to 275 degrees F.

  11. In a large oven-safe skillet, heat the remaining oil.

  12. Sear the beef on all sides, until just browned, about 5 minutes per side.

  13. Transfer to oven and allow to cook 1 1/2 to 2 hours, or until the meat temps at 125 degrees F.

  14. Carefully transfer the beef to a cutting board to rest.

  15. Spread a generous dollop of the herb butter over the roast and cover with foil.

  16. Allow to rest for 20 minutes before slicing and serving.

image1.jpeg